

Baby Clothes Quilt Without Sewing Experience: No-Sew Guide
Table of Contents
- Why a No-Sew Baby Clothes Quilt Is Easier Than You Think
- What You'll Need: Materials and Tools for a No-Sew Baby Quilt
- How to Prepare Baby Clothes and Onesies for a Keepsake Quilt
- Step-by-Step: Cutting and Arranging Your Onesie Quilt Blocks
- How to Make a T-Shirt Quilt Without a Sewing Machine
- Assembling and Securing Your No-Sew Baby Clothes Quilt
- Finishing, Washing, and Caring for Your Keepsake Quilt
- Frequently Asked Questions
Last Updated: October 19, 2026
Why a No-Sew Baby Clothes Quilt Is Easier Than You Think
You do not need a sewing machine to make a baby clothes quilt. A no-sew baby clothes quilt uses fabric adhesive, fusible bonding tape, and a few hand-tied knots to turn onesies and sleepers into a keepsake quilt, and most parents finish one in a weekend. This guide from Johnson Heirloom walks you through the whole process, start to finish, with no prior sewing experience required.

Here is the part most tutorials skip: the hard work is not stitching. It is choosing which clothes to keep and laying them out so the quilt looks balanced. Once those two things are done, the assembly is closer to a craft project than a sewing project.
Below, we show you exactly how to prep, cut, arrange, and secure a baby clothes keepsake quilt you can actually use and wash.
What You'll Need: Materials and Tools for a No-Sew Baby Quilt
A no-sew baby quilt needs four core supplies: fusible bonding tape, fabric-safe adhesive, a rotary cutter or sharp scissors, and quilt backing fabric. Everything else is optional comfort. Below is the exact shopping list for a finished quilt measuring about 36 by 42 inches, a common crib and stroller size that uses a 6 by 7 grid of 6-inch blocks.
The essentials, with quantities:
- 20 to 30 baby garments. Plan on 24 to 30 usable 6-inch squares from that pile. Onesies, sleepers, bodysuits, and receiving blankets all work. Expect to lose 20 to 30 percent of each garment to snaps, necklines, and stained areas, so buy or save more than you think you need.
- Fusible bonding tape, 1/2-inch width, 2 rolls (about 20 yards total). This is sometimes sold as hem tape. You will use roughly 12 to 15 yards on block seams and edge finishing, and stretchy knit eats tape faster than cotton.
- Fabric-safe permanent adhesive, one 4-ounce tube. Look for a washable, flexible fabric adhesive rather than a rigid craft glue. One tube covers edge reinforcement and corner touch-ups on a crib-size quilt.
- Rotary cutter (45mm), cutting mat (at least 18 by 24 inches), and a clear quilting ruler (6 by 24 inches). This trio is the fastest way to cut consistent 6-inch squares. Sharp fabric scissors work, but squares come out less uniform.
- Quilt batting, crib size (45 by 60 inches). You need at least 40 by 46 inches of usable batting; a crib-size package gives you trim room.
- Backing fabric, 1 1/4 yards of 44-inch-wide cotton. That yields a piece about 40 by 45 inches, which gives you 2 inches of overhang on every side for folding and finishing.
- Fusible interfacing, lightweight to midweight, 2 yards of 20-inch-wide. This stabilizes stretchy knits before cutting. Two yards covers 24 to 30 six-inch squares with margin.
- Iron and pressing cloth. A pressing cloth protects delicate knits and prevents fusible residue on your iron plate.
- Safety pins (curved quilting pins preferred), about 80 to 100. You pin every 4 to 6 inches across a 36 by 42 quilt, which works out to roughly 70 to 90 pins.
- Embroidery floss or cotton yarn for tying, 2 to 3 skeins. Each tie uses about 6 inches of floss; 80 ties consume roughly 13 feet, so two skeins is comfortable.
- Hand-sewing needle or large-eye tapestry needle. For pulling ties through the layers.
Optional but helpful:
- Quilt clips or binder clips for holding folded edges while adhesive cures
- A seam ripper for trimming stray threads
- Painter's tape for marking a 6-inch grid on your cutting mat
- A lint roller for removing loose fibers before pressing
What you do not need: a sewing machine, a longarm quilter, or any prior stitching experience. If a tutorial tells you to baste stitch or machine quilt, it is not a true no-sew method and you can skip it for this project.
How to Prepare Baby Clothes and Onesies for a Keepsake Quilt
Start by washing every garment and skipping fabric softener. Softener leaves a coating that weakens adhesive bonds, and the quilt will fail at the seams months later.
Next, sort the clothes into three piles: keep, cut, and skip. Keep the sentimental pieces, cut the stained or worn ones for accent squares, and skip anything too thin to hold a square shape.
Then stabilize each garment. Iron a piece of fusible interfacing to the back of every onesie before you cut. This is the step that makes stretchy fabric behave, and it is what separates a quilt that lasts from one that warps after the first wash.
- Wash and dry all garments
- Sort into keep, cut, skip piles
- Iron fusible interfacing to the back of each piece
- Set iron to the fabric-appropriate heat setting
- Let pieces cool flat before cutting
Step-by-Step: Cutting and Arranging Your Onesie Quilt Blocks
The standard block size is 6 by 6 inches, which matches how professional memory quilts are built and gives you enough room for seam allowances and design placement.
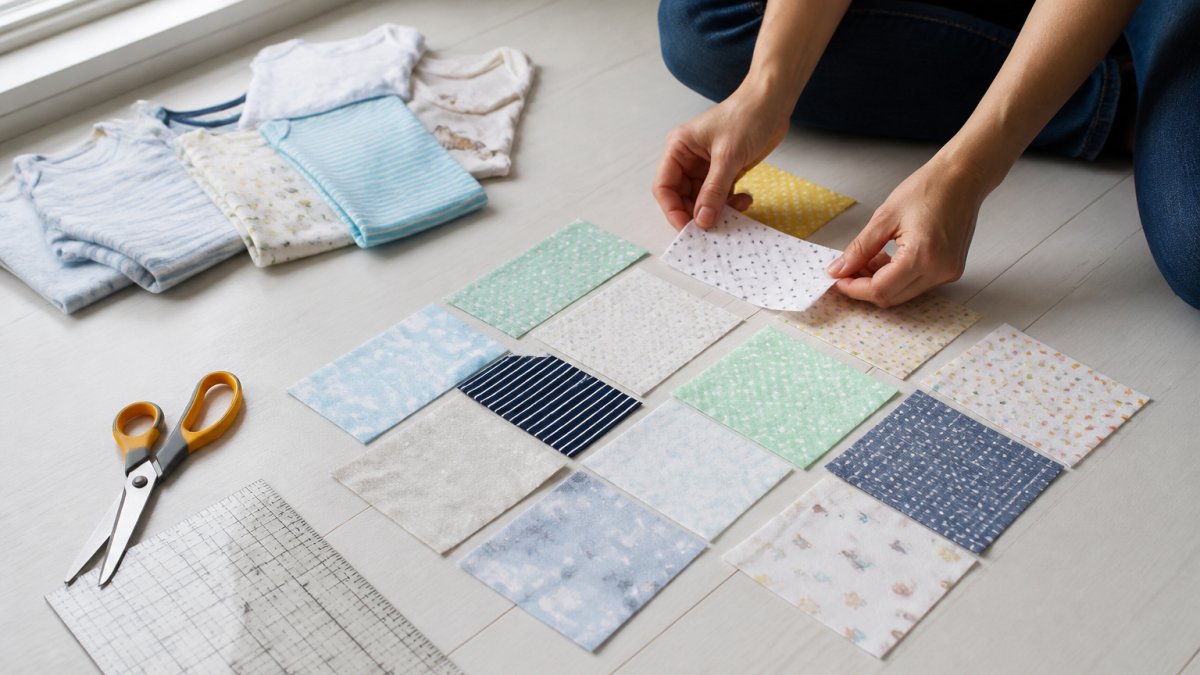
Cutting steps:
- Lay each stabilized garment flat on the cutting mat.
- Place the ruler and cut a 6-inch square, centering the best print or detail.
- Cut all pieces before arranging anything.
- Trim any square that curls at the edges.
Arranging steps:
- Lay all blocks on the floor in a grid.
- Group similar colors diagonally so the eye moves.
- Place the most meaningful blocks in the center.
- Photograph the layout before you move anything.
How to Make a T-Shirt Quilt Without a Sewing Machine
A T-shirt quilt without a sewing machine follows the same method as a onesie quilt, with one change: use a slightly heavier fusible interfacing because cotton jersey is thicker than baby knits.
The no-sew approach works because fusible tape creates a permanent bond when heat-activated. You press, not stitch. For a t-shirt quilt, add a second pass with the iron on each seam to make sure the bond fully sets.
Compare the main no-sew techniques before you commit:
| Technique | Best For | Hold Strength | Washable |
|---|---|---|---|
| Fusible tape | Block seams | Strong | Yes, gentle cycle |
| Fabric adhesive | Edges and corners | Medium | Yes, after full cure |
| Hand-tied knots | Layer securing | Very strong | Yes |
| Fabric glue pen | Small details | Light | Spot clean only |
Assembling and Securing Your No-Sew Baby Clothes Quilt
This is where a no-sew quilt succeeds or fails.
Step 1: Build the quilt sandwich.
Lay the backing fabric face down and smooth it flat. Center the batting on top, leaving an even 2-inch border of backing on all four sides.
Custom Baby Clothes Memory Quilt Made From Onesies | Johnson Heirloom →
Step 2: Baste the layers without thread.
Instead of hand basting, use curved safety pins every 4 to 6 inches across the entire quilt. On a 36 by 42 quilt that is roughly 70 to 90 pins.
Step 3: Tie the layers together.
Thread a large-eye tapestry needle with about 18 inches of embroidery floss or cotton yarn.
Step 4: Join the blocks without a machine.
If your blocks are already arranged edge to edge, join them with fusible bonding tape.
For edges and corners where tape is awkward, run a thin bead of fabric-safe adhesive along the seam and press flat.
Step 5: Secure the edges.
Fold the 2-inch backing border over the raw edges of the quilt top and batting, press it flat, and secure it with fusible bonding tape.
How the no-sew methods compare:
| Technique | Best For | Hold Strength | Washability | Finish |
|---|---|---|---|---|
| Fusible bonding tape | Block seams and folded edges | Strong | Gentle cycle, cold | Flat, nearly invisible |
| Fabric adhesive | Corners and edge reinforcement | Medium | After full 24-hour cure | Slightly stiff until washed |
| Hand-tied knots | Securing batting and backing layers | Very strong | Holds through repeated washing | Textured, handmade look |
| Fleece-knot construction | A different no-sew style using fleece strips | Strong | Machine washable | Fringed edges, no batting |
Fleece-knot construction is worth knowing about: it skips batting and adhesive entirely by cutting fringe along the edges of two fleece layers and tying the fringe together. It is durable and washable, but it does not let you use baby clothes as the quilt top unless you fuse them to a fleece base first, which adds a step.
Finishing, Washing, and Caring for Your Keepsake Quilt
Finish the edges with fusible bonding tape folded over the backing, pressed flat, then reinforced with a line of fabric adhesive. Let it cure a full 24 hours before the quilt touches anything.
Wash the finished quilt on a gentle cycle in cold water, then tumble dry low or air dry flat. Avoid bleach and fabric softener. Check the tied knots once a year and re-knot any that loosen.
If the project feels bigger than you want to take on, that is a normal reaction. Johnson Heirloom has spent over eight years turning baby clothes into custom heirloom quilts, and our Custom Baby Clothes Memory Quilt handles the cutting, stabilizing, and longarm quilting for you. You send the clothes intact, and we build the quilt around the details that matter most.

Frequently Asked Questions
Can you make a baby clothes quilt without sewing?
Yes. A no-sew baby clothes quilt uses fabric adhesive, fusible web, or fabric glue to join blocks instead of a needle and thread. You cut the garments into squares, stabilize stretchy fabrics with fusible interfacing, arrange the layout, and bond the layers together. The result is a soft, washable keepsake that holds up to gentle use, though it will not have the same stitched durability as a machine-sewn quilt. For a truly long-lasting heirloom, a professional option like Johnson Heirloom's Custom Baby Clothes Memory Quilt ($250.00) uses hand-sewn construction.
What materials do you need for a no-sew baby clothes quilt?
You need baby garments, fusible interfacing to stabilize stretchy onesies, fabric scissors or a rotary cutter, a quilting ruler, a cutting mat, fusible web or fabric adhesive, a backing fabric, batting, and binding tape or strips. Add a washable fabric marker for tracing and an iron for bonding.
How do you keep a no-sew baby quilt from coming apart?
Use fusible web on every seam and follow the manufacturer's heat and time settings exactly. Press each bond for the full recommended time, then let it cool before moving the block. Quilt the layers with tied knots every 4 to 6 inches to stop the batting from shifting. Finish the edges with wide double-fold binding tape bonded on both sides. Wash on gentle and air dry to extend the life of the bonds.
Can you use onesies and stretchy fabrics in a quilt?
Yes, but stretchy onesies need fusible interfacing on the back before cutting. Without it, the knit curls, stretches out of shape, and makes crooked blocks. Iron a lightweight knit interfacing to the wrong side of each onesie, then cut your 6-inch squares. This step also keeps the fabric from puckering when you bond it. Delicate or thin fabrics benefit from the same treatment, and it makes the finished onesie quilt lie flatter.
A no-sew quilt is a real option, but it takes patience, and the results depend on how well the fabric is stabilized. If you want a keepsake built to be handled, washed, and passed down, Johnson Heirloom makes handmade quilts from your baby's actual clothing, with professionally longarm-quilted layers, coordinating binding, and optional embroidered names and dates. Get started with Johnson Heirloom and turn those stored-away onesies into an heirloom your family can use.


